In most of the iOS applications we see the list of items that is displayed in the from of list, lets take contact application in iPhone, in this list of contacts are displayed in the form of list, base of the UI element that is used is UITableView, iOS provides the various way to customise the list that is shown to user, in this post we will see how to modify tableview to show customised cells in it. You can make many different cells and displayed in tableview.
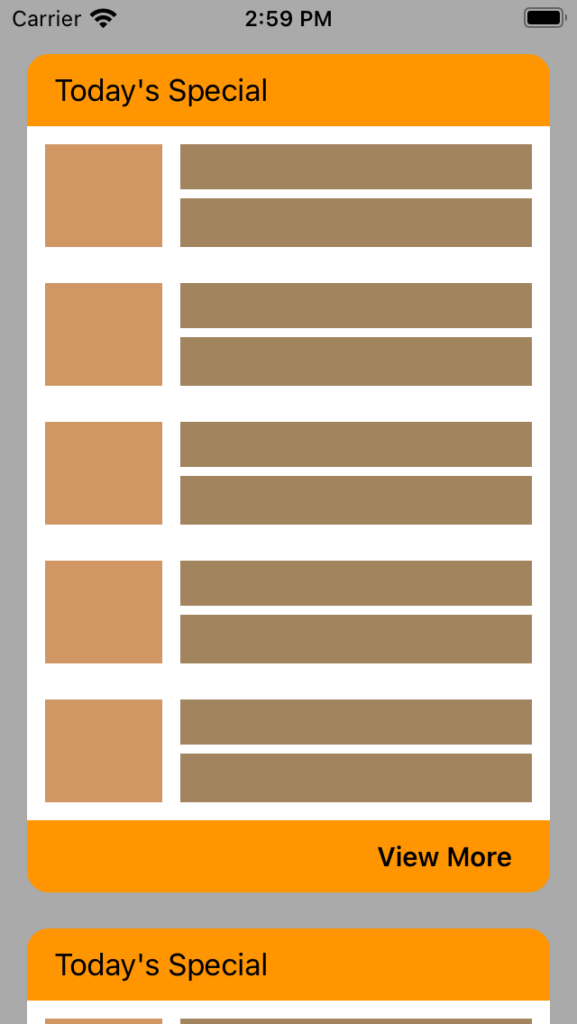
In this post we will be learning how to add custom cells to a table view and in next post we will be learning how to customise header and footer views for table view, in the end of this post we will be able to create a table view with customised cells as shown in below image.
This post will be divided in to 3 parts,
- We will be learning how to add custom table view cell to a table view
- We will be learning how to add custom header view
- We will be learning how to add custom footer view with user interaction with button
Finally we will be creating a project with fully customised cells, headers and footer.
First let’s start with creating a Xcode project with any name, select storyboard with swift as a programming language, after creating a project and open the ViewController.swift file we will start by adding and configuring the tableview.
Add below code in ViewController.swift file.
import UIKit

class ViewController: UIViewController {
    //1 - Defined a outlet for tableview
    @IBOutlet weak var tableView: UITableView!

    override func viewDidLoad() {
        super.viewDidLoad()
        // Do any additional setup after loading the view.
    }
}

    //2 - Confirmed to tableview datasource and delegate methods
extension ViewController: UITableViewDataSource, UITableViewDelegate {
    func numberOfSections(in tableView: UITableView) -> Int {
        return 5
    }

    func tableView(_ tableView: UITableView, numberOfRowsInSection section: Int) -> Int {
        return Int.random(in: 3...5)
    }

    func tableView(_ tableView: UITableView, cellForRowAt indexPath: IndexPath) -> UITableViewCell {
        //3 - returning the dummy tableview cell
        return UITableViewCell()
    }
}
In the above code,
- We declared an outlet for UITableview
- We created an extension for ViewController and confirmed to UITableview delegate and datasource, reason for creating an extension is to keep the separate blocks of code.
- In the required method of UITableViewDatasource tableView(_ tableView: UITableView, cellForRowAt indexPath: IndexPath) method we are simply returning the UITableViewCell instance. We will be making the changes soon.
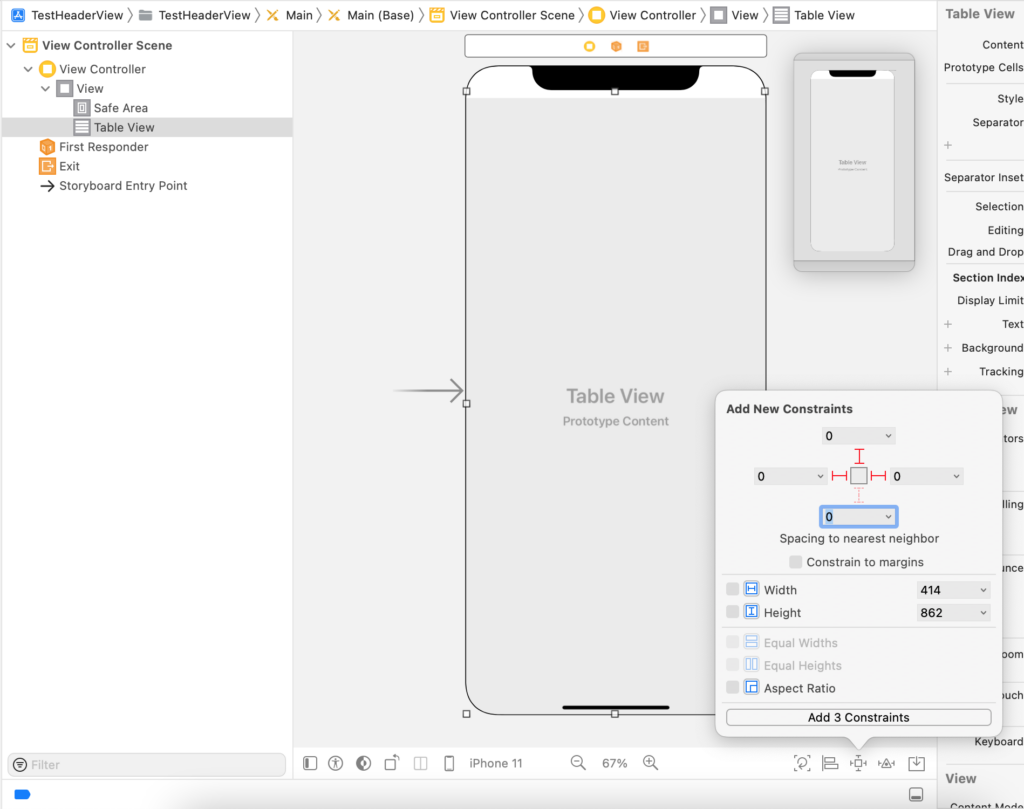
Now let’s open Main.storyboard file and drag and drop the UITableView in to the view and pin it to all sides as shown in below image.
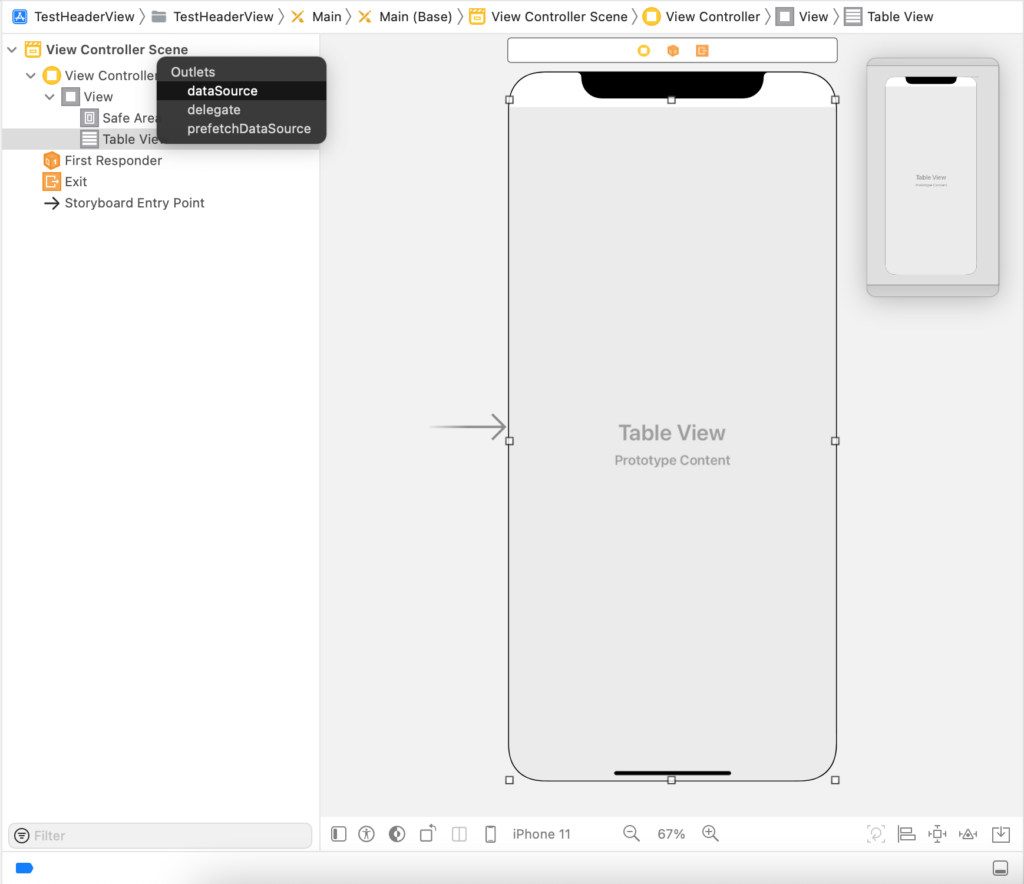
Now set the delegate and datasource to ViewController as shown in below image. Select table view and hold control key and drag to View Controller and release, a popup will show with outlets select both dataSource and delegate (repeat the 2 times to set both the outlets).
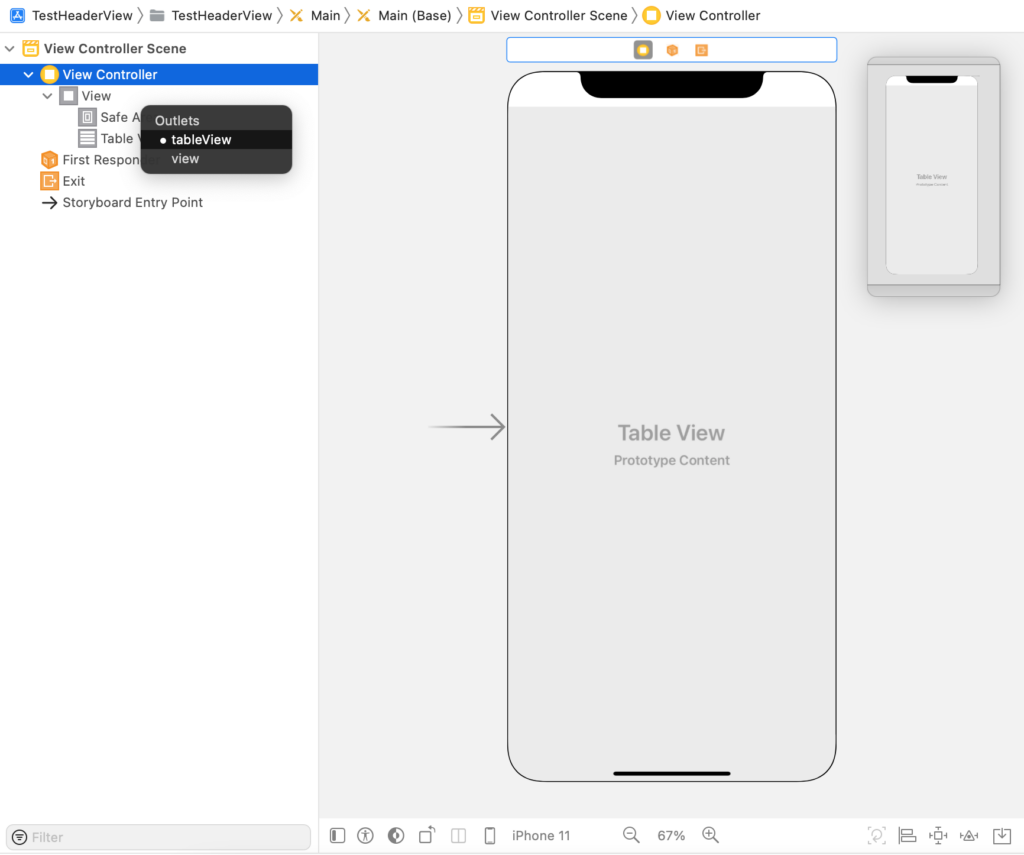
Now let’s connect ViewController’s tableView outlet to the table view added in storyboard, select View Controller hold control key and drag to Table View and release, popup will be shown with tableView select it.
Now if you run the project you will see empty table view as shown below.

Now Lets create a new swift file name it as CustomTableCell and add below code.
import UIKit

//1 - Defined a protocol
public protocol Reuseable {
    static func reuseID() -> String
}

//2 - Defined a class whihc is a subclass of default UITableViewCell
class CustomTableCell: UITableViewCell {
    //3 - created an outlet
    @IBOutlet weak var holderView: UIView!

    override func awakeFromNib() {
        super.awakeFromNib()
    }
}

//4 - added extension for CustomTableCell by confirming to protocol Reuseable
extension CustomTableCell: Reuseable {
    static func reuseID() -> String {
        //5
        return String(describing: self)
    }
}- Defined a protocol named Reuseable kind of helper to make reuse id based on class name
- Defined a class called CustomTableCell which is a subclass of UITableViewCell
- Defined a property called holderView to add our custom views in it in the xib file, this is optional, if you have other UI elements like label, button and other UI elements you can define an outlet for each properties those have some interactions or some other animations that you want to perform.
- Defined an extension for CustomTableCell and confirmed to protocol Reuseable
- Implemented protocol method reuseID() and returning string.
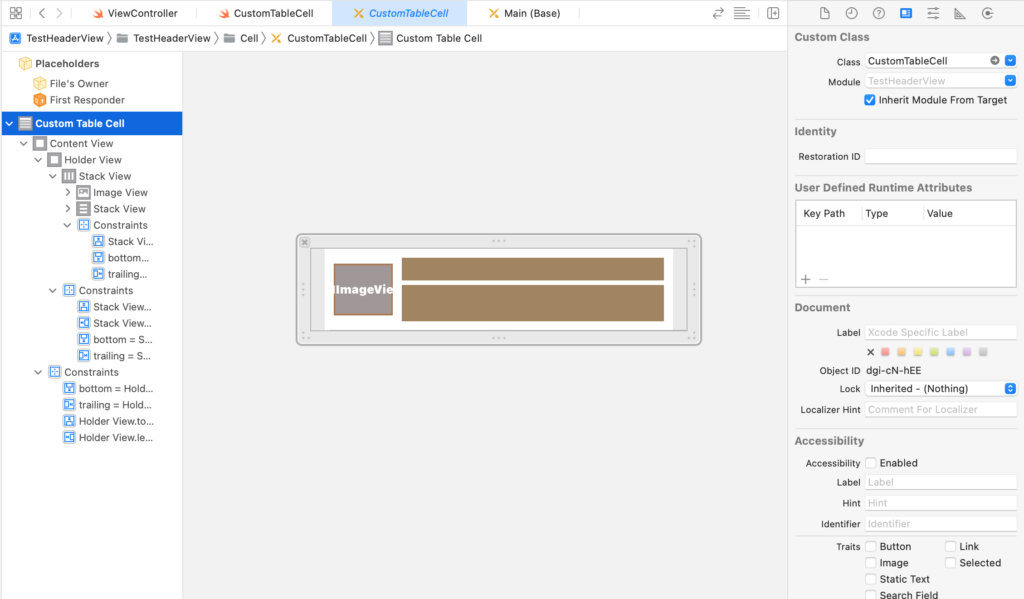
Now create a new xib file name it as CustomTableCell.xib and add some UI elements, for an empty xib add a UITableviewCell and set its class to CustomTableCell this is important, after this add some UI elements for this example we will keep simple as possible by adding an image view and some default stack views, UIViews as shown below. Make sure to pin and add constraints.
Now lets load this cell in to our table view that is defined in ViewController, open ViewController.swift file and change the code as shown below,
class ViewController: UIViewController {

    @IBOutlet weak var tableView: UITableView!

    override func viewDidLoad() {
        super.viewDidLoad()
        //1 - calling custom method to register custom cell to tableview
        registerViewsToTableView()
    }


    private func registerViewsToTableView() {
        //2 - registering th custom cell to tableview
        tableView.register(UINib(nibName: "CustomTableCell", bundle: nil), forCellReuseIdentifier:CustomTableCell.reuseID())
    }
}


extension ViewController: UITableViewDataSource, UITableViewDelegate {
    func numberOfSections(in tableView: UITableView) -> Int {
        return 5
    }

    func tableView(_ tableView: UITableView, numberOfRowsInSection section: Int) -> Int {
        return Int.random(in: 3...5)
    }
    //3 - creating the custom cell
    func tableView(_ tableView: UITableView, cellForRowAt indexPath: IndexPath) -> UITableViewCell {
        let cell = tableView.dequeueReusableCell(withIdentifier: CustomTableCell.reuseID())
        guard let customCell = cell as? CustomTableCell else { return UITableViewCell() }
        return customCell
    }
}
- Calling a custom method registerViewsToTableView in viewDidLoad method to register the custom cell CustomTableCell with the reuse ID.
- In this method we are simply registering the custom cell to the table view, since we are using xib file we need to register with nib file method.
- Finally in the cell datasource method we are asking for table view to dequeue the cell if cell is not available it will create a new cell for us, if any UI updates or any changes that you want to make on the cell, this is the best place to do, after that we are returning the custom cell.
In the above code we are asking table to dequeue the cell, here in table view which is reuses the cell, in order to improve performance, avoid lot of consumption of memory table view will create only limited number of cells that is enough display on the user interface, once the cell or any header or footer view is goes off the UI, then table view will dequeue it, whenever user scrolls down or up the tableview instead of creating the new cell each time it will give the cell that is not visible to user, there by it improves performance. This method dequeueReusableCell(withIdentifier: CustomTableCell.reuseID()) will give either new cell or already created cell based on the user scroll position, for initial launch, there are no cells available in this case this method will create a new cell, after user scrolls down the already displayed cells went off of the screen were dequeued, further call to this function will give already created cell, we don’t need to worry about the logic that is added, UIKit will handle this for us.
Now lets run the project you will see the app like below,
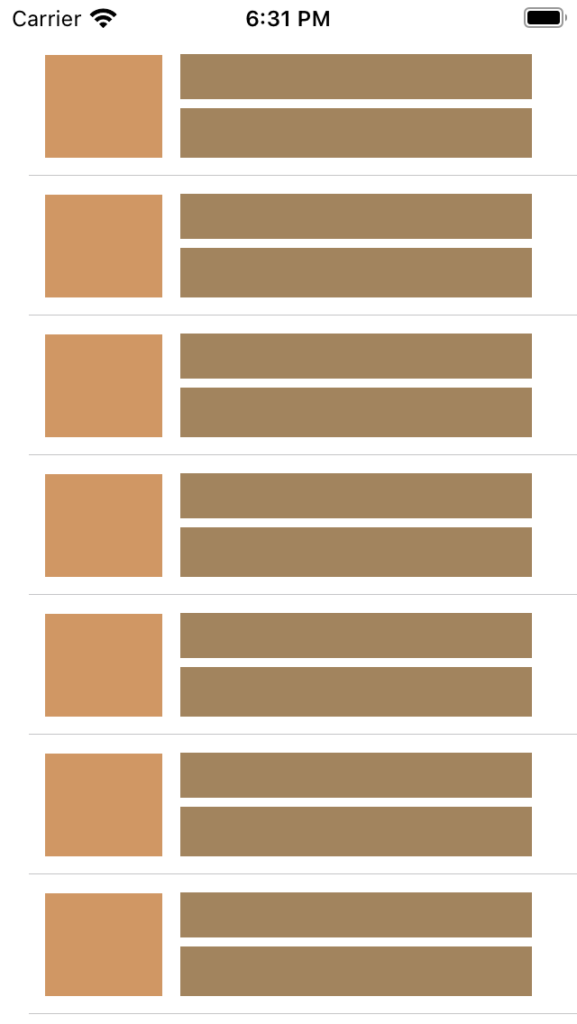
Now our custom cells are displayed, in the next post we will add custom headers and footers to this table and make even more stylish.
You can download sample project from this link.